
本ページではCentOS7にApacheをyumインストールしてWebサーバーを構築するまでの手順を記しております。
CentOSを実装については以下の1をご参考ください。
また、LAMP環境の構築までを各ページで解説していますので、必要な方は一読ください。
- VirtualBoxとVagrantでCentOS7の仮想環境を構築してログインするまで
- CentOS7にApache httpdをインストールしてウェブサーバーを構築 ←今ここ
- CentOS7にPHPをインストールしてinfoページの表示まで
- MariaDBとphpMyAdminインストール
Apacheのインストール
ではさっそくApache httpdをyumインストールしていきます。
以下コマンドを実行します。
[vagrant@localhost ~]$ sudo yum -y install httpd
インストールが始まり文字ががズラーッと流れていきます。
Complete!
Complete!が出できてインストール完了です。簡単ですね。
YUMなどのパッケージ管理コマンドについてはLinuxの基礎を学べるあずき本がとっかかりとしては良いです。

Apache httpdの起動と設定
httpdの起動します。
[vagrant@localhost ~]$ sudo systemctl start httpd.service
[vagrant@localhost ~]$
コマンドを実行しても特に何も表示されないのが正解です。
httpdが起動していることを確認します。
[vagrant@localhost ~]$ sudo systemctl status httpd
● httpd.service - The Apache HTTP Server
   Loaded: loaded (/usr/lib/systemd/system/httpd.service; disabled; vendor preset: disabled)
   Active: active (running) since Wed 2019-08-28 14:17:23 UTC; 7min ago
     Docs: man:httpd(8)
           man:apachectl(8)
 Main PID: 2792 (httpd)
   Status: "Total requests: 0; Current requests/sec: 0; Current traffic:   0 B/sec"
   CGroup: /system.slice/httpd.service
           ├─2792 /usr/sbin/httpd -DFOREGROUND
           ├─2793 /usr/sbin/httpd -DFOREGROUND
           ├─2794 /usr/sbin/httpd -DFOREGROUND
           ├─2795 /usr/sbin/httpd -DFOREGROUND
           ├─2796 /usr/sbin/httpd -DFOREGROUND
           └─2797 /usr/sbin/httpd -DFOREGROUND

Aug 28 14:17:23 localhost.localdomain systemd[1]: Starting The Apache HTTP Server...
Aug 28 14:17:23 localhost.localdomain httpd[2792]: AH00558: httpd: Could not reliab...e
Aug 28 14:17:23 localhost.localdomain systemd[1]: Started The Apache HTTP Server.
Hint: Some lines were ellipsized, use -l to show in full.
[vagrant@localhost ~]$
Active: active (running)となっているのでhttpdは起動していることを確認できます。
httpdの停止する場合は以下コマンドを実行します。
[vagrant@localhost ~]$ sudo systemctl stop httpd
[vagrant@localhost ~]$
httpdの再起動する場合は以下コマンドを実行します。
[vagrant@localhost ~]$ sudo systemctl restart httpd
[vagrant@localhost ~]$
システムを再び起動した時にhttpdを自動起動するように設定します。
[vagrant@localhost ~]$ sudo systemctl enable httpd
Created symlink from /etc/systemd/system/multi-user.target.wants/httpd.service to /usr/lib/systemd/system/httpd.service.
[vagrant@localhost ~]$
自動起動の設定になった確認します。
[vagrant@localhost ~]$ systemctl is-enabled httpd
enabled ←自動起動になっています
[vagrant@localhost ~]$
enabledとなっているので設定できています。
自動起動の解除は以下コマンドで実行します。
[vagrant@localhost ~]$ sudo systemctl disable httpd
Removed symlink /etc/systemd/system/multi-user.target.wants/httpd.service.
[vagrant@localhost ~]$
自動起動が無効設定になった確認。
[vagrant@localhost ~]$ systemctl is-enabled httpd
disabled ←自動起動しない設定
[vagrant@localhost ~]$
disabledとなり解除になっています。
仮想マシンからログアウトします。
[vagrant@localhost ~]$ exit
logout
Connection to 127.0.0.1 closed.
centos7 $
Vagrantfileを設定
ウェブサーバーにブラウザからアクセスできるようにVagrantfileを編集していきます。
centos7 $ sudo vi Vagrantfile
Password: ←ユーザーアカウントのパスワードを入力
Vagrantfileを編集してプライベートIPを有効にします。
  # Create a private network, which allows host-only access to the machine
  # using a specific IP.
  # config.vm.network "private_network", ip: "192.168.33.10"
#を消去すればプライベートIPが有効になります。
  # Create a private network, which allows host-only access to the machine
  # using a specific IP.
  config.vm.network "private_network", ip: "192.168.33.10" ←コメントを外す
Vagrantfileを保存。
仮想マシンを再起動します。
$ vagrant reload
ブラウザからアクセスしてみる
192.168.33.10とアドレスバーに入れてアクセスします。
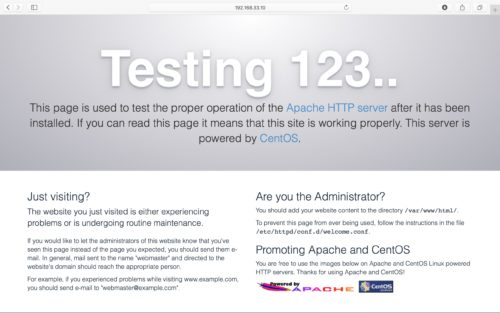
上記の画面が表示されれば、無事アクセスできてます。
最後に
CentOS7へのApache httpdインストールからウェブサーバーを構築して、ブラウザでデフォルトのWebページまで見れました。
使用するコマンドはサービスを起動したり停止したりと割と基本的なものが多いですね。
コマンドとLinuxの構造の理解にはLpicあずき本を
次回はPHPをインストールしていきます。
- VirtualBoxとVagrantでCentOS7の仮想環境を構築してログインするまで
- CentOS7にApache httpdをインストールしてウェブサーバーを構築 ←今ここ
- CentOS7にPHPをインストールしてinfoページの表示まで
- MariaDBとphpMyAdminインストール


コメント