本ページではCentOS7にMariaDBとphpMyAdminをインストールした手順を解説します。
LAMP環境の構築は以下ページの手順をご参考ください。
- VirtualBoxとVagrantでCentOS7の仮想環境を構築してログインするまで
- CentOS7にApache httpdをインストールしてウェブサーバーを構築
- CentOS7にPHPをインストールしてinfoページの表示まで
- MariaDBとphpMyAdminインストール ←イマココ
このページに出てくるコマンドはどれもLpicレベル1程度の内容です。
Linuxnの構造やコマンドの理解にはあずき本が良いです。

MariaDBをインストール
ではさっそくMariaDBからインストールしていきます。
[vagrant@localhost ~]$ sudo yum -y install mariadb-server
以下のようにだぁーっと文字が出てきて
Dependency Installed:
  libaio.x86_64 0:0.3.109-13.el7
  mariadb.x86_64 1:5.5.60-1.el7_5
  perl-Compress-Raw-Bzip2.x86_64 0:2.061-3.el7
  perl-Compress-Raw-Zlib.x86_64 1:2.061-4.el7
  perl-DBD-MySQL.x86_64 0:4.023-6.el7
  perl-DBI.x86_64 0:1.627-4.el7
  perl-IO-Compress.noarch 0:2.061-2.el7
  perl-Net-Daemon.noarch 0:0.48-5.el7
  perl-PlRPC.noarch 0:0.2020-14.el7

Complete!
[vagrant@localhost ~]$
Complete!でインストール完了。
MariaDBを起動する
では続いてMariaDBを起動します。
[vagrant@localhost ~]$ sudo systemctl start mariadb
[vagrant@localhost ~]$
OS起動時に自動でMariaDBを起動するように設定しましょう。
[vagrant@localhost ~]$ sudo systemctl enable mariadb
Created symlink from /etc/systemd/system/multi-user.target.wants/mariadb.service to /usr/lib/systemd/system/mariadb.service.
[vagrant@localhost ~]$
以下コマンドを実行してMariaDBをセットアップしていきます。
[vagrant@localhost ~]$ sudo mysql_secure_installation

NOTE: RUNNING ALL PARTS OF THIS SCRIPT IS RECOMMENDED FOR ALL MariaDB
      SERVERS IN PRODUCTION USE!  PLEASE READ EACH STEP CAREFULLY!

In order to log into MariaDB to secure it, we'll need the current
password for the root user.  If you've just installed MariaDB, and
you haven't set the root password yet, the password will be blank,
so you should just press enter here.

Enter current password for root (enter for none):
OK, successfully used password, moving on...

Setting the root password ensures that nobody can log into the MariaDB
root user without the proper authorisation.

Set root password? [Y/n]
New password: ←パスワードをmariadbと設定
Re-enter new password: ←パスワードをmariadbと設定
Password updated successfully!
Reloading privilege tables..
 ... Success!


By default, a MariaDB installation has an anonymous user, allowing anyone
to log into MariaDB without having to have a user account created for
them.  This is intended only for testing, and to make the installation
go a bit smoother.  You should remove them before moving into a
production environment.

Remove anonymous users? [Y/n]
 ... Success!

Normally, root should only be allowed to connect from 'localhost'.  This
ensures that someone cannot guess at the root password from the network.

Disallow root login remotely? [Y/n]
 ... Success!

By default, MariaDB comes with a database named 'test' that anyone can
access.  This is also intended only for testing, and should be removed
before moving into a production environment.

Remove test database and access to it? [Y/n]
 - Dropping test database...
 ... Success!
 - Removing privileges on test database...
 ... Success!

Reloading the privilege tables will ensure that all changes made so far
will take effect immediately.

Reload privilege tables now? [Y/n]
 ... Success!

Cleaning up...

All done!  If you've completed all of the above steps, your MariaDB
installation should now be secure.

Thanks for using MariaDB!
[vagrant@localhost ~]$
以上でMariaDBのインストールから設定まで完了です。
phpMyAdminをインストールする
次にphpMyAdminもインストールします。
[vagrant@localhost ~]$ sudo yum -y install --enablerepo=remi,remi-php73 phpMyAdmin
Loaded plugins: fastestmirror
Loading mirror speeds from cached hostfile
 * base: ftp.riken.jp
 * epel: nrt.edge.kernel.org
 * extras: ftp.riken.jp
 * remi: ftp.riken.jp
 * remi-php73: ftp.riken.jp
 * remi-safe: ftp.riken.jp
 * updates: ftp.riken.jp
remi                                                     | 3.0 kB     00:00
remi-php73                                               | 3.0 kB     00:00

〜〜〜〜〜〜〜〜〜〜〜
中略
〜〜〜〜〜〜〜〜〜〜〜

  php-twig.noarch 0:1.42.3-1.el7.remi
  php-twig-extensions.noarch 0:1.5.4-1.el7.remi
  recode.x86_64 0:3.6-38.el7

Complete!
[vagrant@localhost ~]$
Complete!でインストール完了です。
phpMyAdmin.confを編集して自分のパソコンからアクセスできるようにIPアドレスを設定します。
[vagrant@localhost ~]$ sudo vi /etc/httpd/conf.d/phpMyAdmin.conf
Require ip 192.168.33を以下の場所に追加します。
   AddDefaultCharset UTF-8


     # Apache 2.4
     Require local
     Require ip 192.168.33 ←このIPを追加

     # Apache 2.2
     Order Deny,Allow
     Deny from All
     Allow from 127.0.0.1
     Allow from ::1
再起動します。
[vagrant@localhost ~]$ sudo systemctl restart httpd
[vagrant@localhost ~]$
アドレスバーにhttp://192.168.33.10/phpMyAdminを入れればログイン画面にアクセスできます。
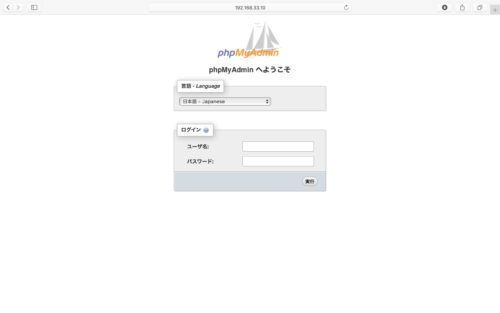
ユーザー名は「root」パスワードはMariaDBをセットアップした時に設定した「mariadb」になります。

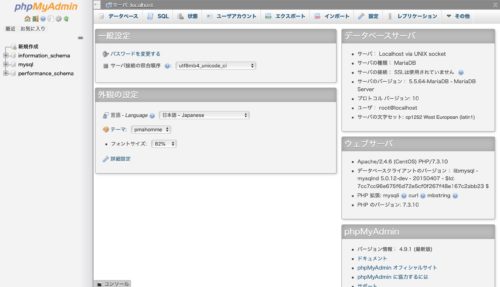
ログイン後、無事に管理画面に入れました。
最後に
CentOS7へのMariaDBとphpMyAdminのインストールはこれで完了です。
これでLAMP環境が構築できました。意外と手順は少ないですね。
- VirtualBoxとVagrantでCentOS7の仮想環境を構築してログインするまで
- CentOS7にApache httpdをインストールしてウェブサーバーを構築
- CentOS7にPHPをインストールしてinfoページの表示まで
- MariaDBとphpMyAdminインストール ←イマココ
これでPHPでゴリゴリ開発できるよう頑張ります。

コメント